MENU service case
 Website construction website design Beijing website construction high-end website production company Shangpin China
We create by embracing change
360 ° brand value__
simplified Chinese character
Simplified Chinese English

Shangpin China Joins Hands with Beisheng Internet to Create a New Chapter in Website Construction

Type: Shangpin Dynamic Learn more

Install Apache, MySql and PHP on Windows
Source: Shangpin China | Type: website encyclopedia | Date: December 14, 2015
The Windows system is the most commonly used system at present. The installation tasks in this section are carried out under the Windows XP system. First, create a folder "php" on disk C to save the installation files.

First download the required Website creation software , and save it to the php folder created by the C drive.

Apache Web Server
//www.apachc.org/dist/httpd/binaries/win32/apache_2.2.25-win32-x86-no_ssl.msi

MySQL database
//dev.mysql.com/get/Downloads/MySQL-5.6/mysql-5.6.20-win32.msi

PHP interpreter
//windows.php.net/downloads/releases/php-5.3.28-Win32-VC9-x86.msi

1. Install Apache

(1) After downloading the software listed above, enter the php folder on disk C, double-click the "apache_2.2.25-win32-x86-no_ssl.msi" file, and then click the "Next" button after the installation interface appears. Select the first radio button to agree to the copyright agreement, as shown in Figure 2.1.

 Consent to copyright


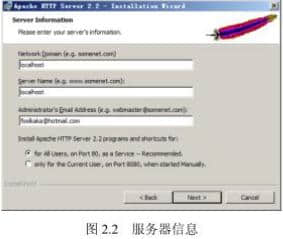
(2) Continue to click the "Next" button. Apache appears Website Design Introduction. Click Next to display the server information form, as shown in Figure 2.2.

 Server information

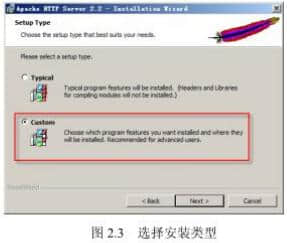
(3) Fill in "localhost" in the "Network Domain" text box in item 1, "localhost" in the "Server Name" text box in item 2, and fill in the e-mail address of the server administrator in the "Administrator's Email Address" text box in item 3. Then click "Next" to display the installation type, as shown in Figure 2.3.

 Select installation type


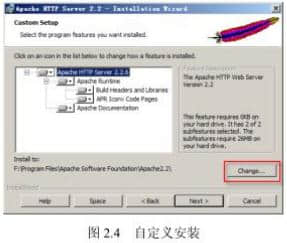
(4) Select the radio button "Custom" and click "Next" to open the custom installation interface. Click the "Change" button, as shown in Figure 2.4.

 custom installation

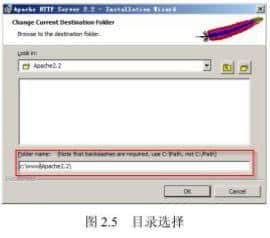
(5) The installation directory selection dialog box is displayed, as shown in Figure 2.5.

(6) In "Folder name", enter "C: wwwApache2.2" in the text box, click "OK" button, continue to click "Next" button, and finally click "Install" button to open the installation. The installation progress bar appears. While waiting for the installation, two command line windows will appear. Ignore it. After the successful operation, it will automatically close until the final installation is successful. Click " Finish button, the Apache Web server is installed.

 Directory selection


2. Install PHP

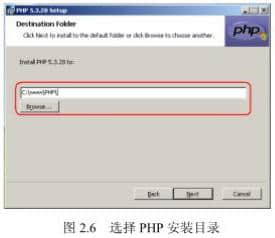
(1) Double click the "php-5.3.28-win32-VC9-x86.msi" file, click the "Next" button, the copyright agreement appears, select the "I accept the terms in the License Agreement" radio button, and click the "Next" button, the installation directory selection interface appears, as shown in Figure 2.6.
 Select the PHP installation directory


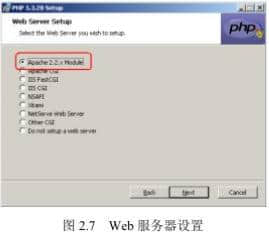
(2) Click Next to display the Web server settings, as shown in Figure 2.7.

 Web Server Settings

(3) Select the radio button "Apache 2.2. x Module" and click the "Next" button. The window to select the Apache configuration directory appears, as shown in Figure 2.8.

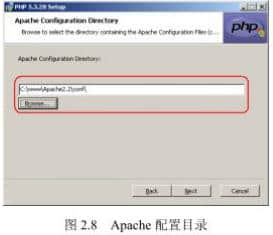
 Apache configuration directory


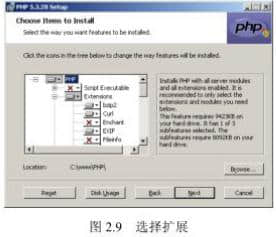
(4) Enter "C: wwwApache2.2conf" in the "Apache Configuration Directory" text box, and click the "Next" button to open the selection expansion window, as shown in Figure 2.9.

 Select Extension
(5) Select gd2, Gettext, imagick, multi byte string, MySQL, PDO | MySQL, xsl, and XML rpc in Extensions, and click Next; Then click the "Install" button. The installation progress bar appears. Wait until the installation is complete, and click "Finish". PHP is installed.

3. Install MySQL

(1) Double click the "mysql-5.6.20-win32.exe" file to open the installation interface, click the "Next" button to open the copyright agreement, select the "I accept the terms in the License Agreement" check box, and click the "Next" button.

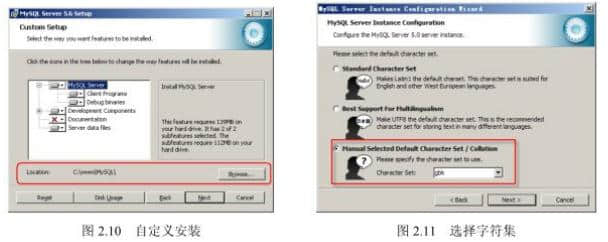
(2) The installation type window appears, click the "Custom" button, and the custom installation interface appears, as shown in Figure 2.10. Click the "Browse" button in this interface to modify the installation location, which is set to "c: wwwMySQL".

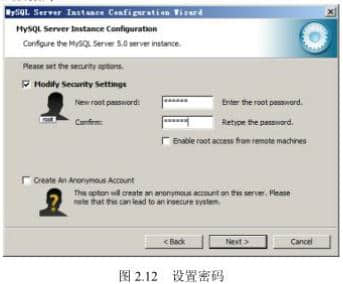
(3) Click "Next", and finally click "Install" to start the installation. After the installation is completed, click "Next" until finally click "Finish", and the configuration window will pop up automatically. Click "Next" until the database character set configuration window appears, as shown in Figure 2.11.

 Custom installation and character set selection

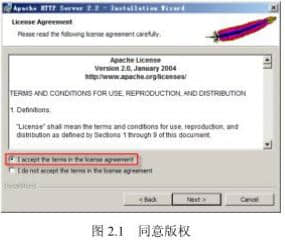
(4) Select the "Manual Selected Default Character Set/Collaboration" radio button, then select "gbk" in the "Character Set" drop-down list, and click the "Next" button until the window for setting password appears, as shown in Figure 2.12.

(5) Enter your own password, click Next, and then click Execute. After the execution, click Finish to complete the MySQL database installation.

 Set Password
Source Statement: This article is original or edited by Shangpin China's editors. If it needs to be reproduced, please indicate that it is from Shangpin China. The above contents (including pictures and words) are from the Internet. If there is any infringement, please contact us in time (010-60259772).
TAG label:

What if your website can increase the number of conversions and improve customer satisfaction?

Make an appointment with a professional consultant to communicate!

* Shangpin professional consultant will contact you as soon as possible

Disclaimer

Thank you very much for visiting our website. Please read all the terms of this statement carefully before you use this website.

1. Part of the content of this site comes from the network, and the copyright of some articles and pictures involved belongs to the original author. The reprint of this site is for everyone to learn and exchange, and should not be used for any commercial activities.

2. This website does not assume any form of loss or injury caused by users to themselves and others due to the use of these resources.

3. For issues not covered in this statement, please refer to relevant national laws and regulations. In case of conflict between this statement and national laws and regulations, the national laws and regulations shall prevail.

4. If it infringes your legitimate rights and interests, please contact us in time, and we will delete the relevant content at the first time!

Contact: 010-60259772
E-mail: [email protected]

Communicate with professional consultants now!

  • National Service Hotline

    400-700-4979

  • Beijing Service Hotline

    010-60259772

Please be assured to fill in the information protection
Online consultation

Disclaimer

Thank you very much for visiting our website. Please read all the terms of this statement carefully before you use this website.

1. Part of the content of this site comes from the network, and the copyright of some articles and pictures involved belongs to the original author. The reprint of this site is for everyone to learn and exchange, and should not be used for any commercial activities.

2. This website does not assume any form of loss or injury caused by users to themselves and others due to the use of these resources.

3. For issues not covered in this statement, please refer to relevant national laws and regulations. In case of conflict between this statement and national laws and regulations, the national laws and regulations shall prevail.

4. If it infringes your legitimate rights and interests, please contact us in time, and we will delete the relevant content at the first time!

Contact: 010-60259772
E-mail: [email protected]