MENU service case
 Website construction website design Beijing website construction high-end website production company Shangpin China
We create by embracing change
360 ° brand value__
simplified Chinese character
Simplified Chinese English

Shangpin China Joins Hands with Beisheng Internet to Create a New Chapter in Website Construction

Type: Shangpin Dynamic Learn more

Photoshop cs4 cs5 Website LOGO Tutorial

Source: Shangpin China | Type: website encyclopedia | Time: May 5, 2015
When you set up a personal website, do you want to have a logo representing the image of the website? In fact, it is not difficult to create a simple and beautiful logo. See "Shangpin China" Website production The production process of the logo, hehe, you can learn it! (The software used is photoshop 5.02 Chinese version)

1、 Production process

1. Create a new file, input 88 for width and 31 for height (select "point" or "pixel" for unit). The separation rate is set to 72 pixels/inch. The mode is set to RGB, and the document background is white.
2. Create a new layer. Select Layer/Effect/Bevel and Emboss in the menu, select Emboss Effect in the "Style" column of the pop-up dialog box, and set the rest to the default values.
3. Set the foreground color to blue. Press Alt+backspace to fill the background with blue.
4. Click the text tool, and set the font to be variety style, 20 points in size and white in color. Enter text.
5. In the menu, select Layer/Effect/Bevel and Emboss, set the depth value and blur value to 3 pixels, and click OK.
6. Select image/mode/index color in the color list. At this time, a dialog box will pop up asking whether to combine layers, and click OK. The Index Color dialog box pops up again. Without changing the default (interlacing) settings, click OK.
7. Select File/Output/GIF89a Output from the menu, keep the default settings in the pop-up dialog box, and click OK.
8. Create a file name you like and save it.
So far, a standard logo has been produced. The original image can be saved as needed. Is it very simple? Of course, this is just an example. As long as you use your imagination, you can create a more personalized logo.

2、 Relevant knowledge

1. Logo size

Common standard sizes are 110 × 38 (pixels) and 88 × 31 (pixels).

2. Image format

There are mainly two file formats for network graphics: jpg and gif.

Experts suggest that online image works should not exceed 50k. According to my experience in practical application, when the domestic network is in the state of tortoise speed, it is generally beneficial to use 10k or so, but not more than 20k at most.
Gif format is a better choice to meet this requirement. In addition, it supports transparency and can also be used for animation. The disadvantage is that it can only contain 256 colors.
The jpg format can achieve a large compression ratio. However, too large compression ratio means that the image quality is degraded. Under the existing technical conditions, the relationship between file size and image quality is a matter of fish and bear's paw.
Try the logo above: save it with different settings and options, and compare the impact of different settings and options on image quality and file size. To achieve the best file size/image quality ratio, you have to practice more.

Let's show you a tutorial case of photoshop cs4 making LOGO:

1、 Logo size: 186 W * 54 H (pixels)

Design, production and analysis of simple LOGO (after reading the design scheme of the following LOGO)

 Course cases of LOGO

2、 Designing LOGO and Basic Operation of Photoshop with Photoshop

1) Photoshop cs4 application icon
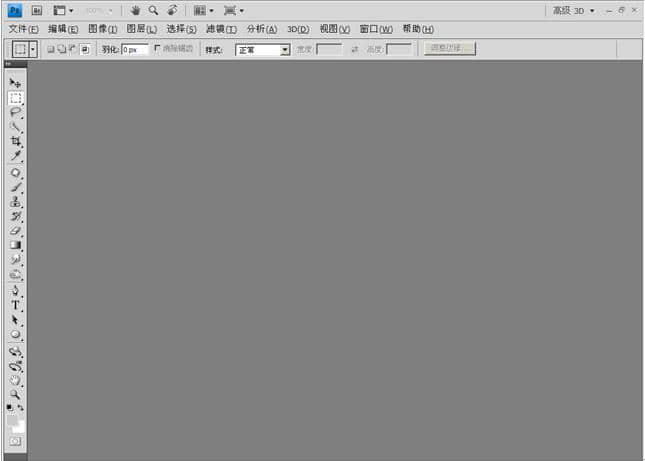
2) Double click to open the working interface
 Photoshop work interface

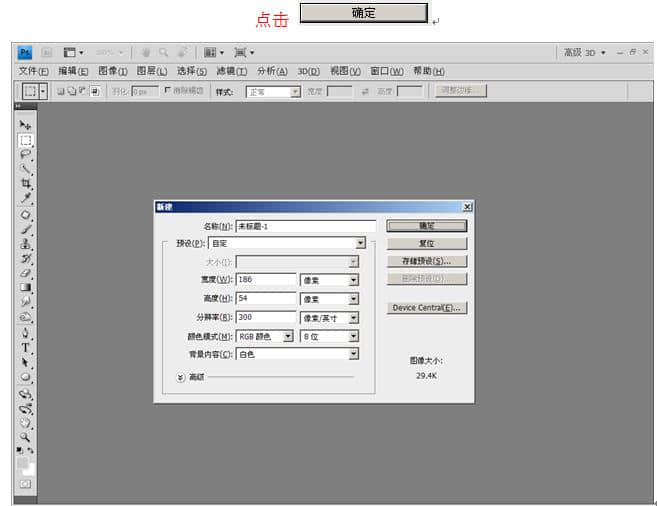
3) Click the File menu/New button to open the New window
Name: fill in the company name
Preset: optional
Width: 186 pixels Height: 54 pixels (size of LOGO)
Resolution: 300 pixel inches
Color mode: select RGB color 8-bit channel (common color for website design)
Background content: white

 File menu/New button brings up the new window

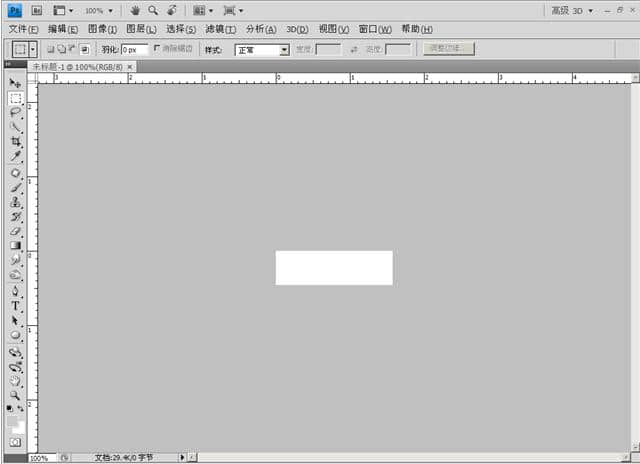
Photoshop cs4 design and production interface

 Photoshop cs4 design and production interface

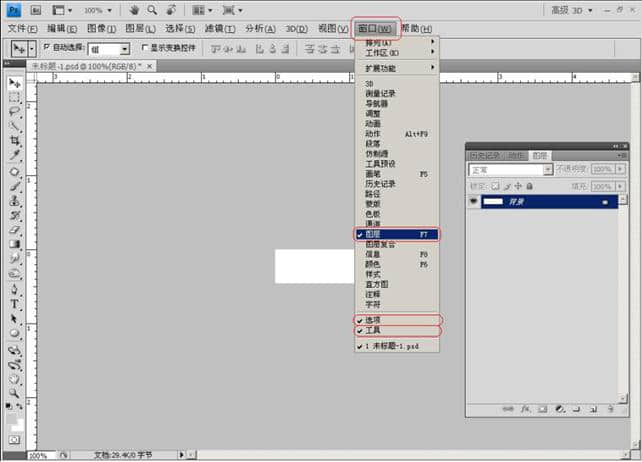
Call up the common window: first click Window on the menu bar → Common window such as Layer/Options/Tools


Take the enterprises of the peninsula city-state as an example to make a LOGO
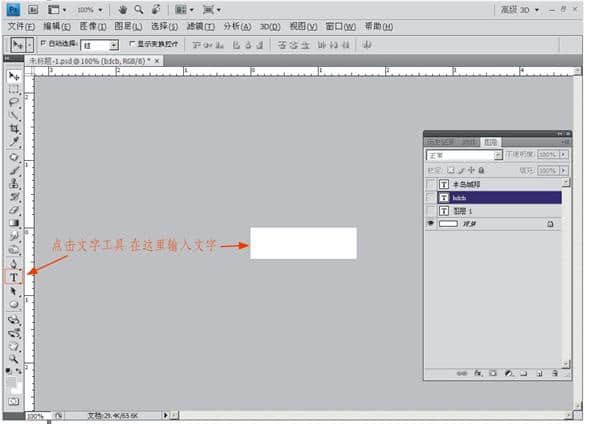
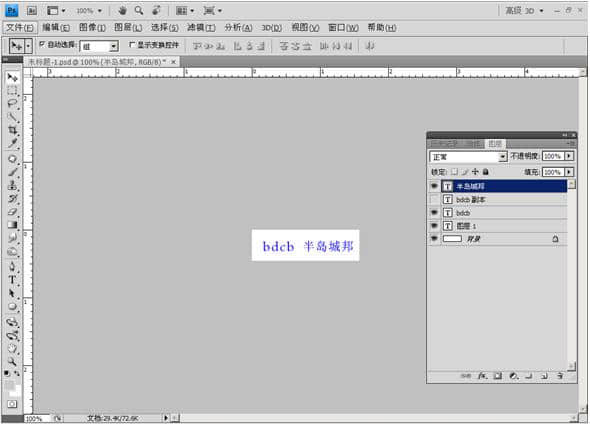
Click the text tool in the toolbox and enter "BDCB Peninsula City-state" in the blank of the window (here, the combination of the company's initials and pinyin is used as a logo design mode)


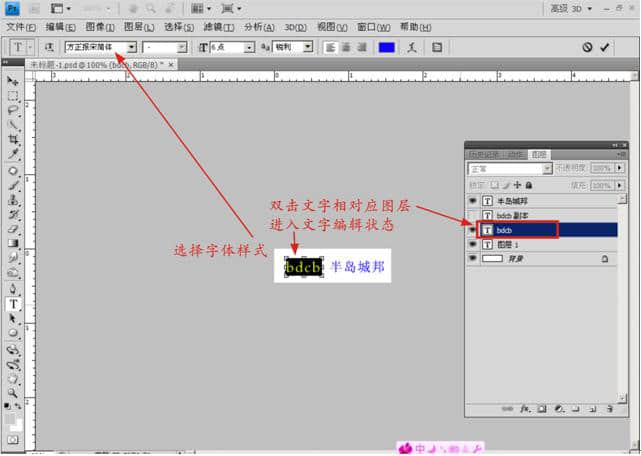
Double click text to edit Select text style and color


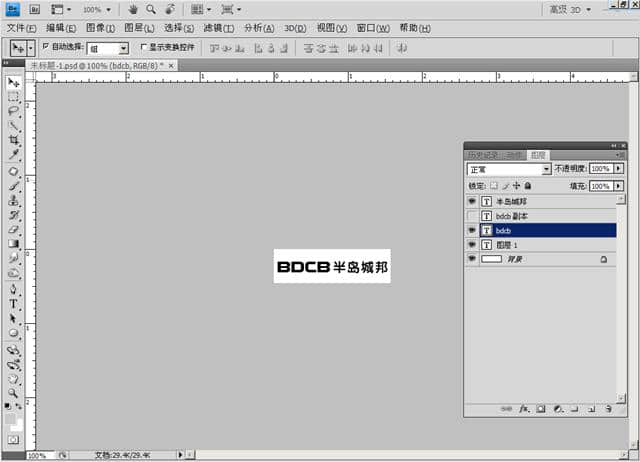
The font can be selected freely. The overall color and font can be matched reasonably and beautifully


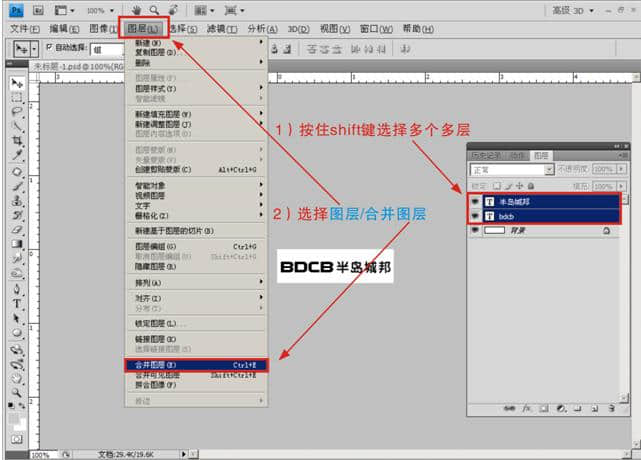
After selecting the font and color, merge the layers (select the layers to be merged, press Shift to select multiple consecutive layers, and press Ctrl to select multiple discontinuous layers), and then select the menu layer/merge layers

Layer explanation: Generally speaking, a layer is like a film containing elements such as text or graphics, which are stacked one by one in order to form the final effect of the page. Layers can precisely position elements on the page. You can add text, pictures, tables, and plug-ins to a layer, or you can nest layers inside.

For example, if you paint on transparent cellophane sheets, you can see the content on the paper below through the cellophane sheets above. However, no matter how you paint on the previous layer, it will not affect the cellophane sheets below. The upper layer will cover the image below. Finally, the cellophane is superimposed, and the final composite effect can be changed by moving the relative position of each layer of cellophane or adding more cellophane.


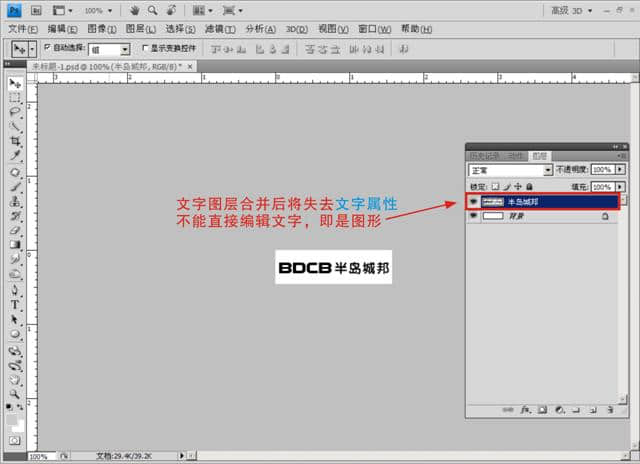
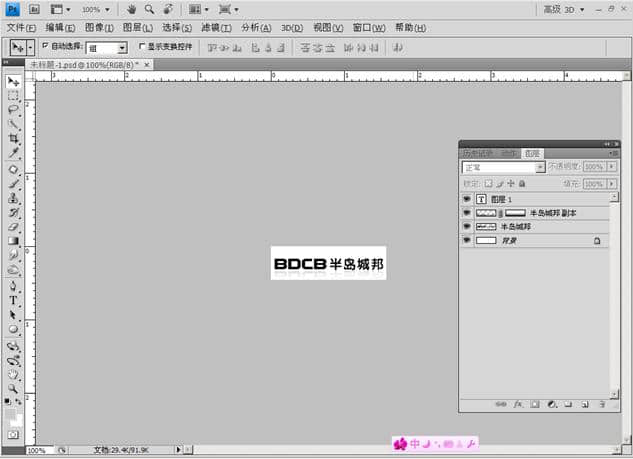
After merging text layers, text attributes will be lost after merging text layers, and text cannot be edited directly, that is, graphic layers


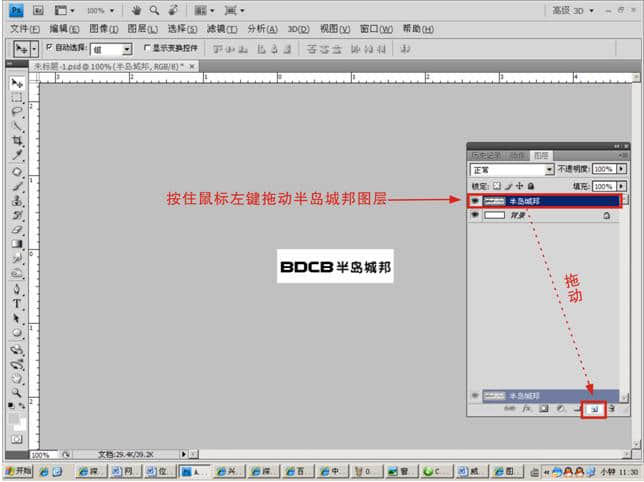
Next, add a shadow effect to increase the appreciation of LOGO
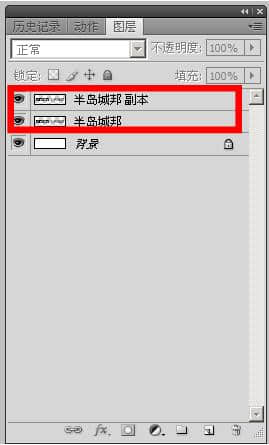
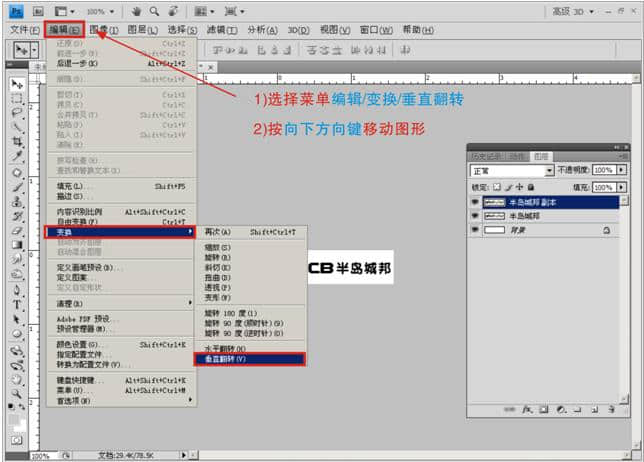
Hold down the left mouse button and drag to the duplicate layer


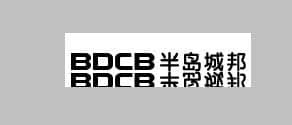
The following effects are obtained


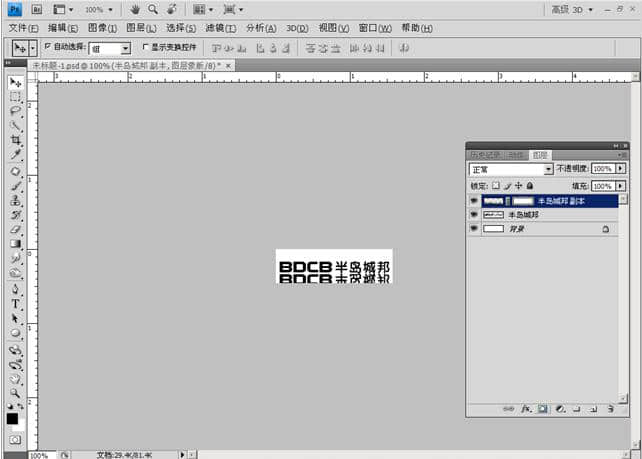
The following effects are obtained


Select the copied layer Click the layer mask


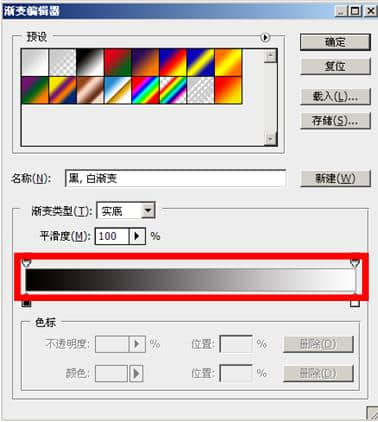
Click the color gradient tool Choose a color gradient From black to white


Press and hold shift to pull out the gradient vertically from bottom to top. The effect is as follows


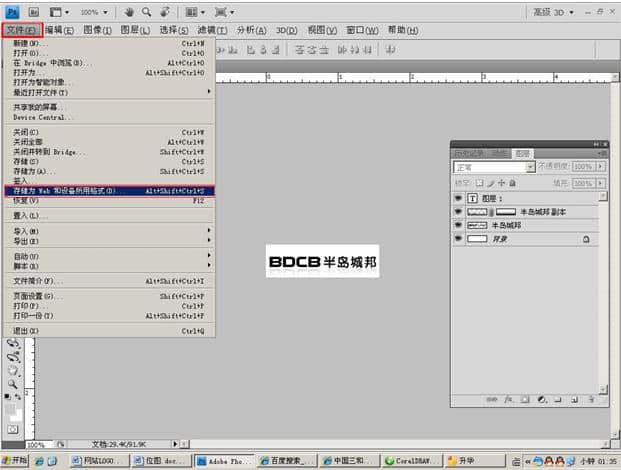
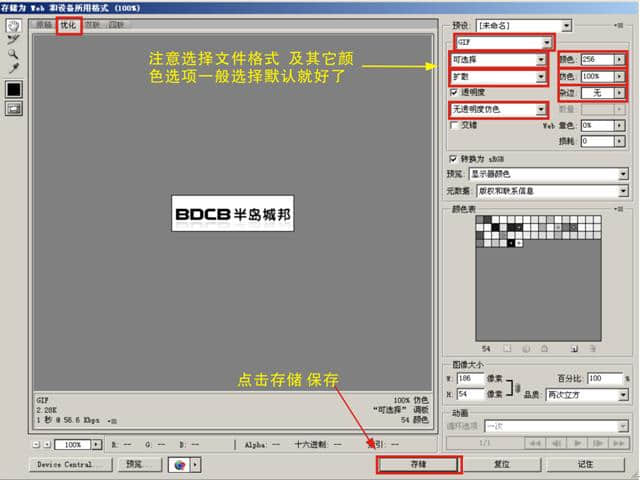
Save graphic menu file/store as web and device format


Click Save to finish saving!


Source Statement: This article is original or edited by Shangpin China's editors. If it needs to be reproduced, please indicate that it is from Shangpin China. The above contents (including pictures and words) are from the Internet. If there is any infringement, please contact us in time (010-60259772).
TAG label:

What if your website can increase the number of conversions and improve customer satisfaction?

Make an appointment with a professional consultant to communicate!

* Shangpin professional consultant will contact you as soon as possible

Disclaimer

Thank you very much for visiting our website. Please read all the terms of this statement carefully before you use this website.

1. Part of the content of this site comes from the network, and the copyright of some articles and pictures involved belongs to the original author. The reprint of this site is for everyone to learn and exchange, and should not be used for any commercial activities.

2. This website does not assume any form of loss or injury caused by users to themselves and others due to the use of these resources.

3. For issues not covered in this statement, please refer to relevant national laws and regulations. In case of conflict between this statement and national laws and regulations, the national laws and regulations shall prevail.

4. If it infringes your legitimate rights and interests, please contact us in time, and we will delete the relevant content at the first time!

Contact: 010-60259772
E-mail: [email protected]

Communicate with professional consultants now!

  • National Service Hotline

    400-700-4979

  • Beijing Service Hotline

    010-60259772

Please be assured to fill in the information protection
Online consultation

Disclaimer

Thank you very much for visiting our website. Please read all the terms of this statement carefully before you use this website.

1. Part of the content of this site comes from the network, and the copyright of some articles and pictures involved belongs to the original author. The reprint of this site is for everyone to learn and exchange, and should not be used for any commercial activities.

2. This website does not assume any form of loss or injury caused by users to themselves and others due to the use of these resources.

3. For issues not covered in this statement, please refer to relevant national laws and regulations. In case of conflict between this statement and national laws and regulations, the national laws and regulations shall prevail.

4. If it infringes your legitimate rights and interests, please contact us in time, and we will delete the relevant content at the first time!

Contact: 010-60259772
E-mail: [email protected]